So let me start out by saying im not an expert im just laying out a problem i had with my bike an 08 900 classic i have had for 6 years and how i solved it and the results so far.
Its not perfect but it saved me the $$ they want for a new sending unit. IMO the price for the sending units for these bikes is way too high for what they are.
I did not take pictures (wish I had but had a long ride planned the next day and it was after dark when i got to this part of the work i was doing on my bike)
I will do my best to describe what i did so that maybe it will be of some help to another person with the same problem.
So lets start with my issue. My fuel gauge quit suddenly and with out warning. I went through the forums found testing procedures and figured out that it was my sending unit. After looking at the price for a new sending unit and being afraid to trust a used one i rode my bike for a full year using the trip meter and low fuel warning light to let me know when i should fuel up. But i finally decided that i was tired of that and wanted my fuel gauge to be more than just a decoration. I am a big fan of the idea of why go buy something if you can fix what you have so i decided to take a look at the sending unit to see if there was something i could do. So the next step was to pull the sending unit and have a look at it.
In order to do that you must remove the tank there are plenty of threads on here that will walk you through the process and plenty of videos out there to show you how to do this.
A couple of things that i found doing this. First they are not kidding get as much of the fuel out of the tank as you can your going to be moving the tank around to get the sending unit out after it is off the bike and the lighter the better. the other thing was the line for the fuel pump. The slide clip that holds it on the metal line can be difficult to get to slide open take your time and use a small flat head to help you get it open it is plastic to if you get heavy handed you WILL break it and then you have to hunt a new one. Watch your electrical lines as you take the tank off it is very easy to snag them and you don't want to damage them or pull the tank out of your hands and damage your tank or paint.
Once you have the tank off lay some cloth on a table to set the tank on (This is so you don't scratch your paint) I shouldn't have to say that but i almost didn't and caught myself at the last moment. Your going to need to turn the tank on its side or upside down to remove the sending unit. There are 2 different things bolted to the under side of the tank. The one with only 2 wires coming out of it and nothing else is the sending unit and it will be on the right side of the tank. The other is your fuel pump and has the metal line coming out of it that you had to fight to get off. Im not being condescending just trying to do my best to be as descriptive as possible for those that may not be able to automatically see which one is which. There are 4 bolts that hold the sending unit in. The gasket is rubber and can be reused if its in good shape. Mine was and i reused it with no problem. But if you want to put a new one on that's fine to its your bike.
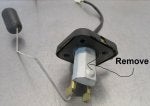
The sending unit will pull almost straight out just watch the float arm. Once mine was out I used a multi-meter on the leads to check the resistance while i moved the float arm and i got the open line meaning i had a broken wire somewhere in the sending unit. While looking over the unit i found a metal cover near the base of the float arm that is held by 3 bent tabs. I unbent the tabs and removed the cover. I have attached a picture of a similar sending unit with the same little metal cover so you can see what I am talking about.
Under the cover i found a flat circuit board like card wrapped in very thin wire. At each end of the card the wire ran up to a connector and was soldered. There is a triangular piece of metal that slides back and forth across the wire that is wrapped around the card as the float arm is moved. As it does it changes the resistance and this is what gives you your fuel reading. (I know its called potentiometer or variable resister but i like layman terms) I noticed on 1 side the wire was broken right below the solder point. Be aware the wire is super thin i had to look close with good light to see it was broken.
Well there is no slack in the wire so i looked at it and realized that at each end of the card there is a little hole in the card that they fed the wire through to keep the wire from moving back and forth across the card with the triangular piece i talked about. It is fed through the hole more that once.
So i used a small pick and very carefully pulled the wire back through the hole 1 time which gave me just enough wire to now get back to the solder point. I held it in place and re-soldered it to the contact point. (you just want enough to hold it in place not a big GOB of it or it may affect the resistance reading. I checked it with the multi-meter again and sure enough i was getting a changing resistance reading as the float arm was moved. So i put the little metal cover back on and put it back in the tank and put everything back together. Note don't forget the little 2 wire connector when you put the tank back on. I did and so my fuel gauge still wasn't working till i took the bezel back off and plugged it in.
End result My fuel gauge works just like it did before. The tiny change in the amount of wire was not enough to seriously change how the gauge reads and it cost me nothing but time to fix it.
Hope this helps anyone out there having the same issue.
Its not perfect but it saved me the $$ they want for a new sending unit. IMO the price for the sending units for these bikes is way too high for what they are.
I did not take pictures (wish I had but had a long ride planned the next day and it was after dark when i got to this part of the work i was doing on my bike)
I will do my best to describe what i did so that maybe it will be of some help to another person with the same problem.
So lets start with my issue. My fuel gauge quit suddenly and with out warning. I went through the forums found testing procedures and figured out that it was my sending unit. After looking at the price for a new sending unit and being afraid to trust a used one i rode my bike for a full year using the trip meter and low fuel warning light to let me know when i should fuel up. But i finally decided that i was tired of that and wanted my fuel gauge to be more than just a decoration. I am a big fan of the idea of why go buy something if you can fix what you have so i decided to take a look at the sending unit to see if there was something i could do. So the next step was to pull the sending unit and have a look at it.
In order to do that you must remove the tank there are plenty of threads on here that will walk you through the process and plenty of videos out there to show you how to do this.
A couple of things that i found doing this. First they are not kidding get as much of the fuel out of the tank as you can your going to be moving the tank around to get the sending unit out after it is off the bike and the lighter the better. the other thing was the line for the fuel pump. The slide clip that holds it on the metal line can be difficult to get to slide open take your time and use a small flat head to help you get it open it is plastic to if you get heavy handed you WILL break it and then you have to hunt a new one. Watch your electrical lines as you take the tank off it is very easy to snag them and you don't want to damage them or pull the tank out of your hands and damage your tank or paint.
Once you have the tank off lay some cloth on a table to set the tank on (This is so you don't scratch your paint) I shouldn't have to say that but i almost didn't and caught myself at the last moment. Your going to need to turn the tank on its side or upside down to remove the sending unit. There are 2 different things bolted to the under side of the tank. The one with only 2 wires coming out of it and nothing else is the sending unit and it will be on the right side of the tank. The other is your fuel pump and has the metal line coming out of it that you had to fight to get off. Im not being condescending just trying to do my best to be as descriptive as possible for those that may not be able to automatically see which one is which. There are 4 bolts that hold the sending unit in. The gasket is rubber and can be reused if its in good shape. Mine was and i reused it with no problem. But if you want to put a new one on that's fine to its your bike.
The sending unit will pull almost straight out just watch the float arm. Once mine was out I used a multi-meter on the leads to check the resistance while i moved the float arm and i got the open line meaning i had a broken wire somewhere in the sending unit. While looking over the unit i found a metal cover near the base of the float arm that is held by 3 bent tabs. I unbent the tabs and removed the cover. I have attached a picture of a similar sending unit with the same little metal cover so you can see what I am talking about.
Under the cover i found a flat circuit board like card wrapped in very thin wire. At each end of the card the wire ran up to a connector and was soldered. There is a triangular piece of metal that slides back and forth across the wire that is wrapped around the card as the float arm is moved. As it does it changes the resistance and this is what gives you your fuel reading. (I know its called potentiometer or variable resister but i like layman terms) I noticed on 1 side the wire was broken right below the solder point. Be aware the wire is super thin i had to look close with good light to see it was broken.
Well there is no slack in the wire so i looked at it and realized that at each end of the card there is a little hole in the card that they fed the wire through to keep the wire from moving back and forth across the card with the triangular piece i talked about. It is fed through the hole more that once.
So i used a small pick and very carefully pulled the wire back through the hole 1 time which gave me just enough wire to now get back to the solder point. I held it in place and re-soldered it to the contact point. (you just want enough to hold it in place not a big GOB of it or it may affect the resistance reading. I checked it with the multi-meter again and sure enough i was getting a changing resistance reading as the float arm was moved. So i put the little metal cover back on and put it back in the tank and put everything back together. Note don't forget the little 2 wire connector when you put the tank back on. I did and so my fuel gauge still wasn't working till i took the bezel back off and plugged it in.
End result My fuel gauge works just like it did before. The tiny change in the amount of wire was not enough to seriously change how the gauge reads and it cost me nothing but time to fix it.
Hope this helps anyone out there having the same issue.